Desktop 3D printing is going through a material renaissance now, as new filaments and affordable printers come to the market. While new polymer filaments get market attention, 3D printed homes are another market that is open to 3D printing.
Cement presents a innovative medium for 3D printing. I have been experimenting with 3D printing cement by making molds to test different cement mixes. I wanted to see if it would be possible to modify a desktop printer to 3D print house model or household items in cement.
FRESH Bio Printing
While working with a 3D printer company, I had the privilege of talking to Thomas J. Hiton. He published the Large Volume Extruder (LVE) for bio printing in 2018. Hinton also released the files for the printer modifications under open source, so anyone can download and modify the parts to fit their printer. He designed his LVE to fit a PrintBot desktop printer. His printing method is called freeform reversible embedding of suspended hydrogels (FRESH). In this method the desired material is printed with a needle into a gel support matrix. Hinton tested his printer by 3D printing alginate into a gel matrix.
From Cells to Cement Printing
When I looked at what Hinton had done for his printer modification, I immediately saw the application for printing with cement. I have been looking at 3D printing homes, but I was struggling with how to model cement in the small scale. There are a few filaments that have a stone appearance, but I did not want to 3D print with a composite filament that felt like plastic. If you want to model and 3d print a full size home, you should be able to print the model in cement.
Adapting to Taz 5
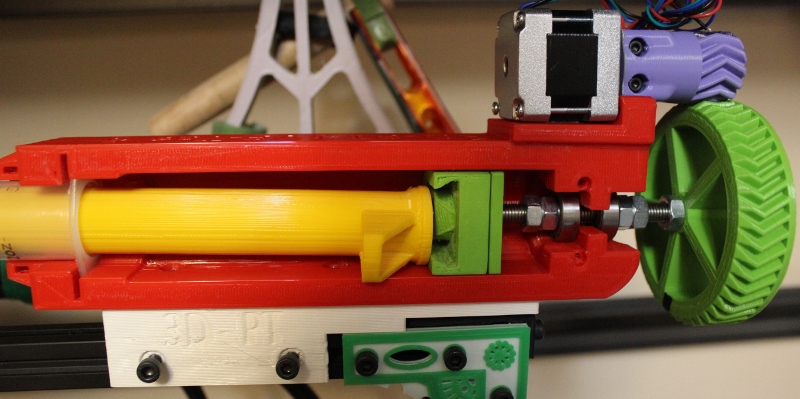
For this project I wanted to modify the Large Volume Extruder to print on a Lulzbot Taz 5 printer.
After downloading all the files from the NIH site, I saw that I would need to add a mounting plate and different nozzle for cement printing. For print ability, I also modified the plunger to make it easier to print. I imported the files to TinkerCAD along with the factory toolhead parts from Lulzbot to modify them.


Toolhead Changes
For this project, I’m converting the Taz 5 from direct drive to Bowden toolhead system. This way the tool head just has to position the nozzle for cement extrusion. I modified the factory toolhead pieces to just hold a tube. To save time in the future, I made the nozzle the same length as the hotend of the standard toolhead. I hope this way I don’t have to change my z axis offset when I switch between the standard and cement toolhead. Later at a hardware store I found some thumbscrews that would be a great way (I hope) to clamp the tube into the head.

After printing the nozzle pieces, I bolted them to a carriage mount I salvaged from a failed filastruder project. With this carriage the goal was again to not have to make large changes to the printer settings between the standard and cement tool heads.
Going to the printer, the syringe plunger seemed to have the hardest time printing. After a couple errors I added a post to connect the end to the build plate.
For the Core of the LVE, I used the MOARstruder toolhead to quickly hog out the main shape. However I was not satisfied with the coarse print, so I reprinted the core with a standard toolhead in PETG.
Syringe Extruder
I’m worried that the cement mix will be the limiting factor for how well this works. In watching how houses are printed, they seem to have a cement mix that is the consistency of toothpaste.
I did cement experiments while casting candle holders. The initial experiments did not go well. I found that using just sieved sidewalk cement, the plunger would press out fine Portland mud, but the 60 mL syringe would clog with a solid plug of medium sand. It will take a blend with better flowing properties to work with the syringe system. Next time I’ll experiment with a mix of fine sand and Portland cement.
Next Steps
- Modify the syringe to extrude cement instead of alginate.
- Test the CURA setup required to run this.
- Figure out the step settings for the motor to extruded consistently for a larger tube.
- Develop a cement mix that will flow through a modified syringe and tube.
- Figure out the CURA profile for cement printing.
- Develop a test file for cement printing.
Stay tuned! The next blog and video will cover the assembly of this cement printer. If you would like to know more, please leave a comment below!
I don’t even know the way I finished up right here, but I thought this put up was great.
I do not realize who you are however definitely you are going to a
famous blogger in the event you are not already.
Cheers!